#How to do basic cleanup on computer computer boosting
Explore tagged Tumblr posts
Visit Tumblr Blog
Explore Tumblr blogs with no restrictions, modern design and the best experience.
Last Seen Tumblr Blogs


Fun Fact
After the announcement of the deal with Yahoo!, there were 170K signatures of unhappy Tumblr users petitioning to prevent the sale in 2013.
Link
How to do basic cleanup on computer computer boosting
If you are tired of your slow computer then you can go for basic clean up. You can boost your computer by performing a basic clean up. Learn more about how to do basic cleanup on computer through this video. Visit https://www.routerloginsupport.com/ to know more.
https://youtu.be/DVbqVqxaOA8
0 notes
Text
7 Ways to Improve Your Computer Performance
Its inevitable that all computers will experience slower speeds at some point. As software becomes more demanding, the way in which your PC reacts to these changes can have a big impact on its performance. The operating system you have and whether you have chosen to upgrade to Windows 10 can also make a big difference.
While you can make some
upgrades to your laptop
to make it run faster, there are some improvements you can make that are more cost-effective and straightforward to do. These minor adjustments may not seem like they will speed up your computer performance, but combined they can make it possible to keep your PC functional for a number of years.
There are also several types of software available that can help you to get rid of old files while locating applications that you don’t use often and may want to uninstall. These programs can also alert you to files and software that may be the
causes for a slow computer
and may ultimately be worth deleting.Here are seven ways you can improve computer speed and its overall performance.
1. Uninstall unnecessary software
Your computer comes preloaded with a number of applications that many people won’t use but that can eat up system resources. You can usually identify these when you see a pop-up prompting you to update a program you’ve never used before.
Remove them from your computer and free up disk space
Click on the "Start" button and visit the “All apps” menu
Here you can view a list of the applications you have installed - and the ones you haven’t
Once you find the program you want to uninstall, right-click on the icon to see the "Options" menu
Or, you can right-click on Start and visit Programs and Features. Windows assistant Cortana can also be helpful because it can perform a search for “Programs” in its search box. From there, you’ll find a record of which apps you’ve used recently and which take up the most space. After surveying what’s installed, you can decide which programs can be deleted to help improve system performance.You’ll also want to know which programs are required for your computer to run properly and which can be discarded. One of the reasons these applications slow down your PC is because they often start up automatically when you boot up your computer.If you aren’t sure whether you want these applications permanently erased, you can take a more an in-depth look at the applications you want to remove within the aforementioned menus.
2. Limit the programs at startup
Along the same lines, you can also determine which applications run when your PC boots up. Windows 10 has an updated Task Manager that makes it easier to determine what you want running in the background and what you can start on your own.
To access Task Manager, press Ctrl-Shift-Esc
A box will appear that lists all the applications you have installed on your computer
It also gives you a detailed account of the amount of RAM each program uses when you start your PC
To make an adjustment, just right-click on the application you want to change to tell it not to run until commanded
You can always change the settings if you notice that a program is no longer running that impacts how you use your PC. If in doubt, you can always restart your computer and see how it runs without certain applications available at startup.
3. Add more RAM to your PC
In terms of memory usage, Windows 10 uses less RAM than previous versions, but
increasing RAM memory
has been a tried-and-true way to speed up devices for years.If you have a
convertible or detachable laptop
, you’ll likely need to settle for what came in the box. Some business and gaming laptops make it possible to add RAM, but it can still be tricky.It’s much easier to add more RAM to desktop computers, and it’s much cheaper, too. Anyone with a basic idea of the interior of a desktop tower is capable of installing more RAM in an hour or so.You can also take your computer into a professional shop to have more RAM installed. If you’re worried about potentially compromising your system or doing this incorrectly, then having an opinion from someone who knows what he or she is doing can ease your mind and make adding extra memory easy.
4. Check for spyware and viruses
It’s almost impossible not to pick up a virus at some point while browsing the web, but the new Windows Defender software has made it easier than ever to find malware that may be causing major issues on your PC. Third-party programs are also easy to install and can be just as effective in removing any spyware or viruses you may have picked up.Some applications are better than others and some can take up more space, which can then cause issues with speed. Ideally, you want to find software that is efficient and removes malware completely, but that doesn’t take up too much space on your PC.
Consider installing two types of software for computer performance monitoring. Malware cleanup programs can solve lagging or blatant issues with speed or popups. However, you should also look into applications that offer ongoing protection and run in the background. Again, keep in mind that these antivirus programs take up space, so you want to choose one that is designed not to affect performance. A little research can help you to find the software that works within your budget or with your specific type of operating system. There can be compatibility issues if you’re downloading free software, so double-check everything before installing it so you don’t run into additional performance problems.
5. Use Disk Cleanup and defragmentation
Every computer has a number of files and programs on its hard drive that haven’t been used in a while or are unnecessary. Disk Cleanup allows you to find which applications and files can be deleted from your computer, freeing up drive space for the programs you will use.It is incredibly easy to access Disk Cleanup.
From the Start button or Cortana search box, you’ll be sent to the program
A quick scan will show you the temporary files, installer applications, and web pages that you haven’t used or no longer need
From there, it will automatically delete them and clear up some space
Disk Cleanup’s effectiveness depends on how much RAM you have on your PC, which can also cause your computer to run slower than it normally would. If this is the case, it may be a good idea to install more RAM on your device.You should also schedule disk defragmentation on a semi-regular basis so you can be aware of how much hard-drive space you have. Windows has an Optimize Drives tool, which you can access from the Start button or your Cortana search box. There are also a number of third-party programs that can be helpful in clearing out files that you don’t use anymore.
6. Consider a startup SSD
When you want better performance, a startup
solid-state drive
(SSD) can go a long way toward taking some of the pressure off the processor when your computer boots up. If you tend to run a number of applications at one time or use photo and video editing software, then a startup drive can go a long way toward making these programs run smoother and load faster.While they’re most commonly installed on desktop computers, SSDs can be used on some laptop models as well. When you don’t have the option of using an internal SSD, you can always purchase an
external drive
that connects to your PC with a USB 3.0. This drive can give you the extra push you need at startup to accomplish tasks and give you a boost for apps that need more temporary memory to run properly.You can find a number of SSD options that work within your budget depending on how you use your PC. Storage review sites online can be valuable sources of information when you want to choose the right drive for your computer and you need to know that it is compatible with your operating system.
7. Take a look at your web browser
Minor adjustments can often make a difference with the speed of your PC. Something as simple as which browser you use can slow down or speed up the rate at which web pages, videos, and images load. If you have been using a certain browser and notice that there is a lag time, consider an alternative to see if the loading speeds are better.The type of browser you use is not only the thing that may be slowing down your computer when you’re using the web. If you have a full cache that has not been emptied in a while, then you’ll want to visit your settings and make sure that it’s empty.Your cache comprises what you pick up when you are visiting various websites. Many sites use cookies in order to figure out your browsing habits and the ads you may click when you visit a site will leave one too. A cache holds these files as information and if you spend a lot of time online, these files can accumulate and cause your computer to run more slowly. Fortunately, it’s an easy fix. There are two ways to do this in the more popular web browsers:
1 note
·
View note
Text
How To Cut The Vinyl Using A Vinyl Plotter

Contrary to printing a image, cutting vinyl to build picture decals is a bit longer expensive. After is your procedure flow for those steps necessary to reduce vinyl and employ your sticker for your intended area, read this article.
Ways
Create your own artwork.
Straightforward art like text is the simplest art to reduce with a vinyl cutter. All keyboard fonts have been considered vinyl plotter ready vector artwork. All of text on most of the Windows or Mac included fonts may also be typed straight into a vinyl cutting program. This includes fonts like image. Alternatively, you can draw contours and put together vector art for vinyl cutting edge with a graphics program such as Corel Draw InkScape or Adobe Illustrator. Usually, when folks want to vinyl reduce on an image, making vector artwork that is tidy could be the very time consuming process but yet it is the most important.
If you take a photo and draw it into a cutting app like Flexi Starter 10 and mechanically convert it into vector artwork you may probably have a mess to cleanup. Vector art format is different from bitmap or JPEG artwork format at that vector art has lines and arcs to define exactly the picture whereas both bitmaps along with their equivalents are a pattern of pixels without any edge definition. Your vinyl cutter machine may cut down lines, arcs and circles however cannot cut on a pixel so all artwork has to be transformed into vector artwork so that your vinyl cutter can lower it correctly.

Connect up your vinyl cutter
Different vinyl plotters are going to have a variety of procedures to join to your PC. Many if not all of these days join through the port. Once you've established the bond in between your cutter and your computer you will need to choose the port or the specific cutter in the indication cutting tool to determine the text in amongst your vinyl cutter machine and the computer software.
Load your material
Basically, vinyl material is roll up fed to some vinyl cutter and hangs off the rear of this cutter on rollers or onto the roller pub. Feed the vinyl below the pinch pliers and on top of the roller pub and release the rollers to carry the vinyl set up.
Create a small line of text You Can send to this cutter
Set the pressure at a very minimal level and then send a lower into the cutter. It's possible that you won't cut through the vinyl. Boost the pressure by an increment of your choice, move again the knob and trim the very same text again. Continue to do this and also remember that the pressure placing for each and every clip till you are entering the vinyl financing but not going through it.
Weed all of the text you have cut
The one which weeds out the finest and leaves a slight impression on the vinyl backing may be the optimized setting for this particular vinyl. Of placing blade trick thickness and tension, this process may want to be replicated each time you transform vinyl kind while the release liner thicknesses and vinyl faculties may differ to roll and may call for different tip depths or cutting pressures.
Minimize your artwork
Use the cutting characteristic of one's sign cutting applications to ship your artwork to the vinyl cutter machine. Cutting your art might take less than a few seconds to many hours based upon sophistication. Simplest indicators and decals simply take only two or three momemts.
Take Away your cut vinyl
Advance the vinyl roll with the cutter controller panel release the rollers and then pull your vinyl forward. Use scissors trim your own vinyl out of the base roll.
Peel the transfer tape off in the discharge liner and your graphics needs to really come together along with your move tape. Should they do not push the tape tape down and use the squeegee to adhere to the move tape to your decal. Simply take this decal and apply it to the surface. From that point, make use of your squeegee with a felt sleeve to clean your own sticker onto your intended surface removing all bubbles.
1 note
·
View note
Text
10 Tips to Increase Windows 10 Effectiveness
Use a Thumb drive with Ready Boost If your computer just doesn't always have enough memory to take care of today's Memory hungry applications, you may give Ready Boost a go. Simply connect a memory stick, along with the Autoplay dialog under general options click "Speed up my system". Then in the Properties dialog box select the Ready Boost Tab select how high of the flash drive to utilize and then click "OK". The body begins while using usb drive as extra memory. Disk Cleanup to get rid of Old Files The Disk Cleanup utility removes old temporary files which are taking up space that might be utilized by the os to enhance performance. When you have used your whole body a lot than you almost certainly possess a lots of temporary files just trying out space. To take out these files click on the Windows button and sort Disk Cleanup. Then open the Disk Cleanup application. Windows asks you which of them disk to operate the cleanup utility on. Select your Operating System drive (usually c:) and click on "OK". Windows will analyze your disk drive and demonstrate just how much space could be reclaimed using the Disk Cleanup utility. Select the temporary items you want to remove and click on "OK". Windows asks you for a confirmation after which will go to be effective. If the cleanup utility finishes you need to have more disk space on your Operating-system to work with. Disable Fancy Visualizations Windows 10 has very fancy visualizations such as transparent window boarders and fading system messages. Your personal computer has got to render every one of these visualizations. This is OK should your strategy is more advanced, if a computer is about the older side you might want to disable these visualizations to gain back system performance. To disable the Windows Visualization effects and quicken your computer go through the Windows button and sort "sysdm.cpl" devoid of the quotes. Then click on the Advanced tab. Then go through the Performance Box Settings button. Finally, select "Adjust for the best performance" and click OK. Alternatively, you are able to deselect each item manually in order to tweak your optimization. Windows won't look as pretty, nonetheless it should improve your speed. Windows Troubleshooter Windows is now offering a built-in tool to find and fix common problems. Because it is already installed and readily available for use it's worth a try. In case you experiencing stability problems or noticing system errors, it could be the result of a system configuration issue or even a corrupted file. To run over the integrated Windows troubleshooting software click the Windows Key and kind "find and fix" (devoid of the quotes) and then click the "Find and fasten problems" link. Then click through the course and descriptions in an attempt to resolve any system issue you could be experiencing. Uninstall Unneeded Software Installed software takes up resources for example disk space. Also if the program has a service that runs a process on boot up it's trying out CPU time that is used for other pursuits. A few applications aren't bad, but if you have 20-40 applications they mount up. To take out unneeded applications, select the Windows button and then click on settings. Next visit System, last but not least select Apps & features. Look through this list of all the installed software and take off everything else you don't require anymore. Now you are done give your system a new reboot to ensure one's body memory gets cleared out. Experience an SSD The biggest thing I noticed about Windows 10 up to now is it can be quite disk active. After upgrading a Windows 8.1 laptop to Windows 10 I came across the disk usage was getting 100% use most of the time. This laptop a magnetic based platter style hard disk which can be a lot slower than system memory. This caused it to own trouble keeping up with the demanding Operating System. Should your system is around the older side, you are probably in the same boat where you can magnetic based platter hard drive too. Solid State Disks (SSDs) use non-volatile flash memory to store information. Basically these are fast really big USB Flash drives. If your system disk produces your operating system to decelerate than adhere to what they notice more system performance. Your system will boot way faster and will also be more responsive. To find out if the body is suffering from high disk usage open Task Manager by holding down Ctrl+Alt+Delete (devoid of the + signs) then visit Task Manager. Then click the Performance tab. If your disk drive/s show all-around 100% usually than you will make use of a SSD upgrade. Disable any Unneeded Processes on Startup It appears as if every bit of software really wants to run a process on startup for your requirements know "update". How frequently think updates turn out? All of those other time the operation is checking for updates, checking for updates, and to know what else. You do not need it running all the time specifically if you are close to resources already. To disable processes from running on startup open the task manager by holding the keys Ctrl+Alt+Delete (devoid of the + signs). Then select Task Manager. Go through the Startup tab. Now evaluate the report on software and disable as needed. Hopefully this will buy you back some system resources and cause one's body being more responsive. Disable Unneeded Services This is a big one. Enabled services means processes running continuously and taking resources away from the user. Also, they are running on startup, however they keep the process going even when it gets stopped from Task Manager or crashes. A lot of services should be made for that operating-system, but alternative party applications can setup services when they are installed. If you're not building a server of some sort or other than you almost certainly have no need for that software running on a regular basis. To disable services from running automatically click on the windows button and after that type msconfig thus hitting enter. Click on the Services tab. Then I recommend checking the box to "Hide all Microsoft Services" to ensure that you don't stop a crucial service the Os depends upon. After hiding the Microsoft services, you'll get a list of services to endure. Most of these may be safely disabled. In case you are doubtful let it rest enabled, or disable it and discover what goes on. You can always re-enable the service utilizing the same process. When you're done click on the OK button. Windows will prompt you for a reboot. That is essential for the alterations to adopt effect, so go on and reboot. After having a reboot you're going to get a show up indicating that system settings were changed. Because you caused modifications you are able to safely ignore that message. If you've been able to disable a respectable amount of services, you should notice a bump in system performance. Use a Different Browser for Internet Surfing Thus far my exposure to Microsoft Edge (the brand new built-in Web browser in Windows 10) is always that it's buggy and slow. A case in point that we have started using Google Chrome for those my web browsing. It won't have to be chrome, however if you are frustrated using a slow buggy internet browsing experience you could try installing a 3rd party browser. Upgrade versus a brand new Install And that means you took Microsoft up on the sale for the free upgrade now one's body is slow? If you have ever had any knowledge about Windows upgrade installations, it's likely you have possessed a slow system or errors that popped up for seemingly absolutely no reason. Irrrve never had great luck with Windows upgrades of course, if i hear you ask any IT guy they're going to probably show you in order to avoid them and opt for a full fresh install. Windows 10 definitely seems to be no different towards the predecessors. Utilizing a fresh install versus a better install can improve your system performance, if you might have exhausted all the options you might want to give it a try. For additional information about punto switcher have a look at our new resource.
1 note
·
View note
Text
10 Hints to Develop Windows 10 Functionality
Utilize a Flash Drive with Ready Boost Should your computer just doesn't need enough memory to keep up with today's Memory hungry applications, you could possibly give Ready Boost a shot. Simply turn on a usb drive, as well as in the Autoplay dialog under general options click "Speed up my system". Then within the Properties dialog box go through the Ready Boost Tab select how a lot of the flash drive to utilize and after that click "OK". The body begins using the memory stick as extra memory. Disk Cleanup to take out Old Files The Disk Cleanup utility removes old temporary files which can be trying out space that is utilized by the operating system to improve performance. When you have used one's body a great deal than you almost certainly have a great deal of temporary files just taking on space. To eliminate these files click on the Windows button and kind Disk Cleanup. Then open the Disk Cleanup application. Windows will ask you which disk to run the cleanup utility on. Select your Main system drive (usually c:) and then click "OK". Windows will analyze your disk drive and demonstrate simply how much space might be reclaimed while using the Disk Cleanup utility. Select the temporary things you desire to remove and click on "OK". Windows will ask you to get a confirmation and then go to operate. When the cleanup utility finishes you have to have more disk space on your Os to utilize. Disable Fancy Visualizations Windows 10 has very fancy visualizations such as transparent window boarders and fading system messages. Your pc has to render these visualizations. This really is OK if your strategy is high end, yet, if your computer is about the older side you might want to disable these visualizations to get back system performance. To disable the Windows Visualization effects and quicken your pc click the Windows button and type "sysdm.cpl" without the quotes. Then click the Advanced tab. Then click the Performance Box Settings button. Finally, select "Adjust for best performance" and click OK. Alternatively, you are able to deselect each item manually if you want to tweak your optimization. Windows won't look as pretty, nevertheless it should improve your speed. Windows Troubleshooter Windows is now offering a built in tool to get and connect common problems. Becasue it is already installed and readily available for use it's worth an attempt. In case you experiencing stability problems or noticing system errors, it could be the result of a system configuration issue or even a corrupted file. To operate over the built in Windows troubleshooting software go through the Windows Key and design "find and fix" (devoid of the quotes) and click on the "Find and fasten problems" link. Then click on the course and descriptions to resolve any system issue you may be experiencing. Uninstall Unneeded Software Installed software takes up resources including disk space. Also if this system includes a service that runs an activity on boot up it's using CPU time that might be useful for other items. One or two applications aren't bad, but if you have 20-40 applications they accumulate. To eliminate unneeded applications, click the Windows button after which select settings. Next click on System, last but not least select Apps & features. Look through their email list of all the installed software and take away whatever you don't need anymore. Now you are done lengthy system a whole new reboot to make certain your System memory gets cleared out.

Receive an SSD The biggest thing I noticed about Windows 10 thus far could it be can be very disk active. After upgrading a Windows 8.1 laptop to Windows 10 I discovered the disk usage was getting 100% use the vast majority of time. This laptop were built with a magnetic based platter style hard drive which can be a great deal slower than system memory. This caused it to own trouble checking up on the demanding Operating System. If the method is around the older side, you may be in the same boat and also have a magnetic based platter hard disk too. Solid State Disks (SSDs) use non-volatile flash memory to hold information. Basically they may be fast really big USB Flash drives. If your system disk causes your operating system to slow down than adhere to what they notice an increase in system performance. Your whole body will boot way faster and are more responsive. To see if your whole body is struggling with high disk usage open Task Manager by holding down Ctrl+Alt+Delete (without the + signs) then select Task Manager. Then go through the Performance tab. In case your disk drive/s show close to 100% more often than not than you'll take advantage of a SSD upgrade. Disable any Unneeded Processes on Startup It appears as though each piece of software wants to run a process on startup to you know "update". How frequently do you consider updates come out? The rest of the time the procedure is checking for updates, looking for updates, and that knows what else. You don't need it running continuously particularly if are have less system resources already. To disable processes from running on startup open the duty manager by holding the keys Ctrl+Alt+Delete (minus the + signs). Then select Task Manager. Click the Startup tab. Now evaluate the set of software and disable as needed. Hopefully this will buy you back some system resources and cause your system for being more responsive. Disable Unneeded Services This is the big one. Enabled services means processes running continuously and taking system resources outside the user. Not only are they running on startup, but they keep the process going even if it gets stopped from Task Manager or crashes. A great deal of services are essential to the main system, but vacation applications can setup services if they're installed. If you aren't running a server of some type than you most likely do not require that software running continuously. To disable services from running automatically select the windows button and after that type msconfig and hit enter. Click on the Services tab. I then recommend examining the box to "Hide all Microsoft Services" to be sure you don't stop a critical service that this Main system depends on. After hiding the Microsoft services, you will get a summary of services to undergo. Many of these could be safely disabled. In case you are doubtful get forced out enabled, or disable it and find out what happens. It's possible to re-enable the service with similar process. An individual will be done click on the OK button. Windows will prompt you for a reboot. This can be essential for the modifications to adopt effect, so go on and reboot. From a reboot you're going to get a pop up indicating that system settings were changed. Since you caused the changes you'll be able to safely ignore that message. If you've been in a position to disable a decent amount of services, you should experience a bump in system performance. Make use of a Different Browser for Internet Surfing So far my knowledge about Microsoft Edge (the modern integrated Browser in Windows 10) is always that it's buggy and slow. So much so which i have started using Google Chrome for all my web browsing. This doesn't happen have to be chrome, though if you are frustrated with a slow buggy internet browsing experience you might try installing a 3rd party browser. Upgrade versus a Fresh Install So that you took Microsoft on the offer for any free upgrade and now one's body is slow? If you have ever had any knowledge about Windows upgrade installations, you may have possessed a slow system or errors that appeared for seemingly absolutely no reason. I never had great luck with Windows upgrades and if you ask any IT guy they'll probably show you in order to avoid them and opt for a complete fresh install. Windows 10 appears to be the same for the predecessors. Using a fresh install versus an upgraded install can boost your system performance, and if you have exhausted all other options you might want to give it a shot. To learn more about punto switcher dlya windows 10 go to our new internet page.
1 note
·
View note
Text
wondershare filmora crack free download for windows 10
Inside this information I 'm going to show you three good strategies to boost your laptop. If you will discover, you don't need to fork out for thousands over hardware enhancements; you can increase your machine with out paying a penny! Because like machinery computer parts wear and tear, the electronics and connectors on your hardware parts tarnish and corrode. A person are count your prayers and hope that the parts final another couple of years before wearing. Oftenly wondershare filmora key 8.7.0 are the computer processor or perhaps the cpu, it sometimes can be your harddrive or disk acquire. However wondershare filmora key 8.7.3 to this is actually replace the various and often than not you won't even have the ability to tell should you be parts are worn or not, if you aren't an expertly trained computer technician. Most people end up wasting variety of dolloars recover their PC speed and also gratification and just be sure to make it run like how had been when they first bought it. After spending thousands of dollars over constant upgrades they learn to realize that it really would be cheaper to acquire a brand new computer as opposed to doing constant upgrades. Although wondershare filmora key like use such code to undertake the iobit smart defrag, this action cannot cleanup all the fragmented archives. In order to completely these files completely, we require to apply certain professional software to assist us. According to my personal experience, I think the Smart Defrag 2 is such kind of fantastic software, could be designed for iobit smart defrag. The most the defrag engine and also the most advanced technology ensure to work automatically within back foot-hold.It's been specially made for modern, large hard drives, which eliminates the long waiting second. They realize that they are profiting with the computer problems and don't need to recommend steps towards preventing you from needing their help a good ongoing basis. Eliminate unnecessary startup purposes. Every new piece of software we install thinks it should open automatically every time we start our laptops or computers. Well this is garbage. Not only does it cause your pc to have a slow startup, it also eats up valuable RAM and gives your computer a sluggish feeling. Eliminating as many programs as they possibly can will you could computer faster than ever in the future. Outlined in this article I am going to show you three strategies for getting your appliance back running like it was you very first bought this method! Know what's highly advanced is correct attitude that its going to not even expense basically dime! Now recognize the, over time the system registry gets clogged with a lot of useless information. And no matter how much money you pay for costly hardware equipments (upgrades) you won't ever get satisfied with the speed and gratification of your machine, unless you keep your computer registry wash!
1 note
·
View note
Text
My Macbook Pro Is Restarting On Its Own

Why does my MacBook pro keep restarting on its own?
Unexpected restarts are usually caused by software installed on your Mac, or by devices connected to your Mac. If the issue causes your Mac to restart every time it attempts to start up, your Mac might eventually shut down.
Why does my MacBook keep restarting because of a problem?
Merely starting your Mac in Safe Mode is not intended to resolve the problem, it's to observe its performance without certain additional components. To end Safe Mode restart your Mac normally. Shutdown will take longer as well. Some users have reported an SMC resetto be beneficial. Check the hardware inside your Mac. Please don’t be nervous; you are not required to do it yourself. Apple has many bricks-and-mortar stores, and you can easily get help there. Further reading: Common boot problems after macOS Big Sur update. Coming with the biggest design update, macOS Big Sur made its appearance in June 2020.
Macbook Is Restarting On Its Own
There can be many reasons why your MacBook keeps rebooting. The most common issue is conflicting applications. Another issue could be incompatible hardware or peripheral devices. It could be an issue of not enough RAM or hard drive space.

How do I fix kernel panic on MacBook Pro?
HardwareShut down your Mac and disconnect all hardware except your keyboard and mouse. If you use a third-party keyboard and mouse, swap them for the Apple versions, where possible. Restart your Mac. Shut down your Mac again and re-connect one device. Restart your Mac.
Why does the sound keep cutting out on my MacBook pro?
Fortunately, this problem is easy to fix. Head over to your System Preferences in the Apple Menu, and look for the Sound icon. Try setting the sound to Internal Speakers. While you are at it, take a look at the volume bar below and make sure that your output volume is turned up and Mute is unchecked.
How do I reset the sound on my MacBook?
Click “System Preferences” in the dock and then click “Sound,” located under the Hardware section. Click the “Output” tab and make sure that the proper sound output device is selected. For instance, if you are using built-in speakers, you should have “Internal Speakers” highlighted.
How do I reset the PRAM on my MacBook Pro?
You can reset or “zap” the PRAM on a Mac by pressing and holding the Command, Option, P, and R keys right as you turn the computer on. Yes, there are four keys you need to hold down at the same time. Once your hear the startup chime a second time, the PRAM has been reset and you can release the keys.
How do you know if SMC is reset?
Here are the steps: Reset SMC….4 AnswersCharging indicator is orange light when machine powered off.Keep pressing Shift + Option + Control + Power for 10 seconds and indicator is still orange.Indicator turns to green when release all keystrokes and keeps almost 1 second.Light turns to orange then.
How do you clear RAM on a Mac?
6:23Suggested clip · 92 secondsHow to free up RAM on Mac – YouTubeYouTubeStart of suggested clipEnd of suggested clip
Does SMC reset delete files?
Resetting the SMC will not delete any saved data on the computer, but rather reset certain settings on the computer; ultimately speeding up your Mac.

Is it bad to reset SMC on Mac?
You could try resetting the SMC, or System Management Controller, as a last resort. The SMC manages low level settings, like thermal and battery management. It’s rare, but problems with the SMC can effect performance, and also cause bugs like fans that run constantly even when CPU usage isn’t high.
What does the SMC reset do?
An SMC or System Management Controller Reset can fix various power related issues, such as a piece of hardware not functioning correctly.

How do you clean up your Mac and make it run faster?

13 Ways To Make Your Mac Run Faster Right NowDelete the programs you don’t use anymore. Screenshot. Free up hard drive space in general. Run Monolingual! Close memory-hogging processes. If you still actually use Dashboard, get rid of the widgets you don’t use. Add more memory. Clean up the apps that launch at startup. Update your software!
How do I fix a slow Macbook Pro?
Let’s start with the basics—when your Mac is getting slow, follow these troubleshooting steps to make it faster.Backup Your data. Restart Your Mac. Check Resource Usage. Check Available Storage Space. Test the Hardware. Upgrade Your Mac. Take Your Mac to Apple’s Genius Bar.
Why does my Mac run so slow?
If you find your Mac is running slowly, there are a number of potential causes that you can check. Your computer’s startup disk may not have enough free disk space. Quit any app that isn’t compatible with your Mac. For example, an app may require a different processor or graphics card.
Can you defrag a Mac?
Apple, on the other hand, has never included defragging software in macOS. Modern Macs defrag files automatically, they’ve done this since OS X 10.2 launched in 2002. Defragging can damage a drive because moving files around wears the drive out.
Is there a disk cleanup utility for Mac?
Disk Cleanup Pro is among the free utilities in the Mac App Store, and others can be found online. As with all maintenance programs, however, read the reviews before you download and back up your Mac before using software intended to automatically delete files on your computer — just in case.
How can I check my Mac for viruses?
My Macbook Pro Keeps Restarting On Its Own
A good start to scan your Mac for viruses is to see whether you have applications installed that you don’t recognize:Go to the Applications folder via Go > Applications in Finder or using the shortcut Shift + Command + A .Scroll through the list and delete any unknown applications.Then empty the trash.
How do you clean up a Mac?
Optimize the inside of your Mac with a clean-upStep One: Update your software. Step Two: Tidy up your start up. Step Three: Clean out unused apps. Step Four: Clean out the downloads folder. Step Five: Tidy up your storage disk. Step Six: Clean out the cache. Step 7: Remove resource-hungry programs. Step 8: Take out the trash.
Why is Mac system storage so high?
It’s likely that much of it is accounted for by cache files for apps like Photos and Safari. MacOS caches as much data as it can to avoid having to re-download it, which boosts performance. System storage can occupy tens of gigabytes of space on your Mac for Time Machine backups and cache files.
How do I clean up my macbook pro?
You can quickly clean up your Mac with these easy steps.Clean up cache. You’ve probably heard “Remove your cache” as a web browser troubleshooting tip. Uninstall apps you don’t use. Clean out useless duplicates. Empty the trash. Reduce clutter. Delete large and old files. Remove old iOS backups. Wipe out Language files.
0 notes
Link
How to do basic cleanup on computer
Learn how to a basic on computer. Now, you can boost the speed of your computer by doing a basic up. This video will guide you with the easy steps to cleanup computer in just a few minutes. Visit https://www.routerloginsupport.com/ to know more.
https://youtu.be/DVbqVqxaOA8
0 notes
Text
HOW TO SPEED UP WINDOWS 10
HOW TO SPEED UP WINDOWS 10 https://sandarutec.blogspot.com/
How to speed up Windows 10

Boost your PC efficiency with these top tips
If you’re trying to figure out how to speed up Windows 10, you’ve come to the right place. While Windows 10 is arguably the most efficient coded operating system from Microsoft, we understand that it also has a vast number of features that require large amounts of system resources. Even if its latest iteration comes built-in with extremely useful features to improve overall efficiency, your computer’s performance could still slow down.
There are a number of usual suspects that are most probably responsible for such slow down. That includes bloatware, temporary files and less powerful hardware. And, you can certainly do something about them so you can speed up Windows 10 and put your computer’s performance back up to tip-top shape.
In this guide, we'll explore ten of the best ways that you can speed up Windows 10 today, from defragging and clearing out unwanted programs to disabling superfluous special effects and even performing hardware upgrades. Let us show you how to speed up Windows 10.
1. Restart your PC

While this may seem an obvious step, many users keep their machines running for weeks at a time. Windows 10 will automatically put the display to sleep, but any processes which have previously been started will continue. These can accumulate over time and slow down your computer.
You can fix this issue by shutting down your PC each day once you have finished using it, by clicking on the Windows button and selecting the 'Power' button.
Make sure to close any running programs and save your work before you do so. If your PC has slowed down to the extent that you can't display the Windows menu, manually hold down the Power button until the computer is fully powered off.
2. Update, Update, Update
Microsoft continually releases updates for Windows 10 which are designed to fix common bugs that reduce system performance. Some of these are fairly minor whereas others make significant changes to your system, maximising efficiency.
If machine performance is lagging, open the Windows menu and type 'Update' in the search bar and click 'Check for Updates' to access your settings.
If a major update is available, then make sure to save and back up your personal data before continuing. Your PC may need to restart several times to apply all available updates. If it's been a while since your last update, make sure to click 'Check for Updates' again after restarting to make sure no more are available.
3. Check startup apps
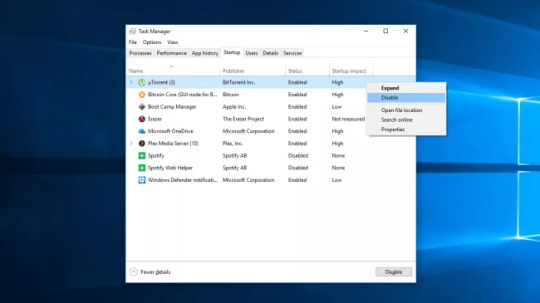
PCs can become bogged down by the sheer number of running processes. This is often because many installers will instruct Windows to run their programs immediately after you log in, slowing down system speed.
To check your startup programs, open Task Manager (Ctrl + Alt + Del), then click the 'Startup' tab. Pay close attention to the 'Startup Impact' values for each program e.g. 'High' as this is a good way to spot apps that are likely to slow your system down.
To prevent a program from launching on login just right-click and choose 'Disable'.
4. Run Disk Cleanup
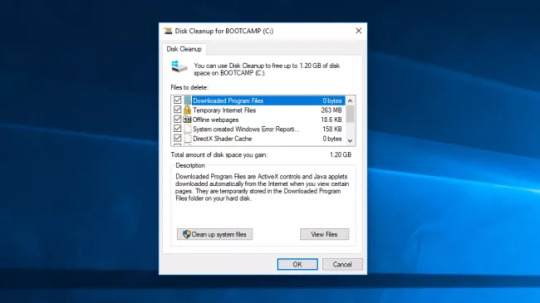
Disk Cleanup is an extraordinarily built-in Windows utility. You can use it to clear out temporary files which accumulate on your machine, such as image thumbnails, downloaded program files and offline webpages.
Click the Windows menu and type 'Disk Cleanup' in the search bar to get started. The utility will offer you a choice of files to remove. Simply mark the check box next to each option. Click 'Clean up system Files' to begin. Disk Cleanup will calculate the amount of space you will save.
This is also a good opportunity to delete any files on your hard drive which you no longer need. An easy place to start is your 'Downloads' folder.
5. Remove unused software
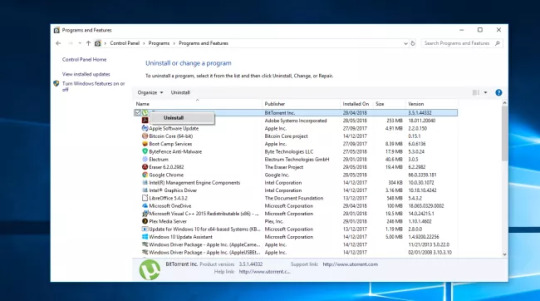
Many PC vendors ship their machines with bundled third party software, which due to its large size and unnecessary nature is sometimes referred to as 'Bloatware'. Many computer users also install software for a specific purpose and never use it again e.g. designing a newsletter.
Redundant programs take up space on your hard drive and can reduce performance. To check your installed apps go to 'Control Panel'>'Programs'>'Programs and Features'>'Uninstall a Program'.
Right-click on any programs you no longer need and select 'Uninstall'. Windows 10 will ask for permission to make changes to your system. Click 'Yes' to continue.
6. Disable special effects
Windows 10 is rather heavy on the special effects side. By default Windows and other features are programmed to fade in and fade out of view. Other resource-intensive but unnecessary features include translucency and animations.
To take your PC back to basics, open the Windows menu and search for 'System', then go to 'Advanced Settings' tab and select 'Performance Settings'.
Under the 'Visual Effects' tab, click the radio button for 'Custom'. From here, you can uncheck the tick boxes next to any visual affects you want to disable. Click 'Apply' to confirm your changes.
7. Disable transparency effects
Besides making heavy use of your system resources to display features like animation, Windows 10 also employs transparency effects for certain features such as the task menu. This seemingly light and simple effect is actually quite complicated to draw, as the system needs to calculate the same plane twice.
To disable transparency effects, open the Windows menu and type 'Make Start, taskbar and Action Center transparent'. This will pull up the 'Color' Settings. From here you can choose to switch off transparency.
You can also change the default app mode here between 'Light' and 'Dark'. This won't affect your system speed, but may make your Desktop easier on the eye.
8. Upgrade your RAM
Your PC's overall speed can be hugely improved by increasing the amount of virtual memory (RAM). Windows 10 requires a minimum of 4GB to run smoothly, although this does not take into account resource hungry applications such as video games.
The easiest solution to this is to install more RAM. Your PC has a certain number of RAM 'slots' into which you can insert chips. To determine the type of memory your machine uses, open Task Manager (Ctrl + Alt + Del), then click 'Performance'. The system will display any memory slots in use as well as the type use e.g. DDR4.
Installing new RAM chips is quite simple. If you do it yourself use an anti-static wrist strap to prevent damage to delicate components. Alternatively many PC repair stores will be happy to do the hardware upgrade for you, for a small fee.
9. Use an SSD

SSDs (Solid State Drives) use Flash memory, the same kind found in USB sticks. They allow for much faster access and writing times then traditional mechanical hard drives which use magnetized disks.
SSDs do cost much more per GB than regular hard drives, but if you're are willing to pay the cost, you'll notice a huge improvement in boot time, files access times and overall system responsiveness.
If you want to buy an SSD to install yourself make sure you have the correct size for your machine (2.5" for portable devices, 3,5" for desktop machines). You can use free software such a Clonezilla to copy content form your current hard disk to your new SSD. See our guide on how to clone your hared drive with Clonezilla.
10. Run System Maintenance
Windows 10 has a built-in utility which performs routine system maintenance tasks such as defragmenting the hard drive, scanning for updates, and checking for malware.
These tasks usually run in the background while your PC is idle but if you have noticed an issue with system performance you can run maintenance manually if you wish.
To get started, open Control Panel, select 'System and Security' then choose 'Security and Maintenance'. Click the arrow to expand the maintenance options.from here you can select 'Start Maintenance'. Close and save any open files before going ahead..
0 notes
Text
How To SpeedUp WordPress Site Speed

You can't afford to waste a second online. Speed matters, especially in regards to loading time. In fact, if your WordPress site is lethargic and forces users to wait around for even a few seconds, you are most likely to feel the negative effects straight away. You can see rising bounce rates, diminished conversions, and bad search rankings. Here in this post of How To SpeedUp WordPress Site Speed,you will get some easy simple ideas.

Luckily, there are many things that you can do to avoid those issues! WordPress as a platform features lots of alternatives for optimizing your website in order to make it faster and more dependable.
In fact, even when you're not an expert in website optimization, you can use several procedures to enhance your website's loading times quickly.
Within this guide, we'll explain everything you can do in order to boost website performance and optimize for speed.
We will also look at how it is possible to diagnose issues that slow down your site and, more crucially, how to repair them. There's a lot to cover, so let's begin!
Why Getting a Speedy Website Is Essential
Today's users expect considerably faster loading times, and your website should live up to those expectations. In reality, making sure your site is fast and performs nicely is the very first of Google's four Internet Basics, and it's easy to see why.

The biggest problem with having a slow site is that your customers will frequently lose patience and leave.
This negatively affects your bounce rate, which reflects the amount of people who click away after just seeing page.
Nearly half of users expect sites to load in just two minutes or less, and 40% will leave a site if it has not loaded within three seconds. In addition, a delay of just 1 second can lead to a 7% reduction in conversions.
15 Best Plugins for Accepting Bitcoin
15 Best WordPress SEO Plugins Those numbers may be startling, but they help to demonstrate the value of keeping a fast, dependable site. If lost traffic and conversions are not convincing enough, you should also consider your website's Search Engine Optimization (search engine optimization ).
Speed is a factor Google cares about, so slow pages may cause a reduction in your search rankings.

Ultimately, you will also need to be aware of the ramifications of your site's speed across platforms. Since 2016, more folks have been using mobile devices to surf the internet than desktop computers. That's almost two-thirds of humans on the planet.
11 Best WordPress Translation Plugins
10 Best Fastest WordPress Themes
Zakra WordPress Theme Review 2020 This matters because nearly all mobile users are on the lookout for a similar experience to that which they'd get on a conventional computer. Nearly half expect websites to load in under 10 seconds.
It's possible to follow suit and make certain that your site is fast enough to keep the consumer's experience welcoming. But, you will first have to understand why your pages may not be performing as well as you'd like. Optimize Your Site with DreamPress
Our automatic upgrades and strong security defenses take server direction off your palms. And did we say the lightning-fast load times? Know More
What Causes Your Website to Slow Down
You should now be completely aware of the negative consequences long load times could have on your website. However, it is equally important that you know the causes of a website to slow down in the first location. We'll be looking in more detail at a few of the causes in the future. Right now, let's quickly run through a few of the most frequent offenders.
Astra – WordPress Theme Review
40 Important WordPress Terms Explained – WordPress Glossary
The most probable cause of slow loading times and a lack of performance is a poorly built site. However, the hosting provider and plan you select are also important factors so you have to make sure that you select an excellent web host for your website.
In case your host is slow or experiences frequent downtimes, so will your website. We are going to discuss how hosts and plans affect your site in more detail shortly, but it is worth repeating that choosing a quality server is a necessity.
In addition, we recommend that you consider managed hosting, which ensures your website is fast, responsive, and dependable. Proven Tips To accelerate WordPress:
How To Boost Loading time of WordPress website
1. This single change could boost your Twitter rate by almost 1.5x. A good deal of WordPress site is still using PHP 5.6 which is a depreciated version of PHP. The most recent one is PHP 7.4 that supplies a substantial performance increase.
The PHP part is handled by your web-hosting company and either you can manually check your Current version of PHP where your WordPress site is running on, or you could simply request the client support:
If it's less than 7.0 (That is 5.6), you can ask them to upgrade to the latest PHP version.
If you are using Bluehost hosting, you are able to follow this tutorial to update Bluehost PHP version.
Select quality Web-hosting Optimized for WordPress and Speed:
This single change can accelerate your WordPress site to a fantastic extent.
Many of us make a mistake by picking up a local web-hosting provider to host our WordPress website. Usually, such hosting is recommended by our designer/developer or somebody known in our group.
Well, your speed test could reveal exactly the same.
Do recall, you should pick only that hosting company that is well optimized for conducting WordPress blogs. SiteGround is undoubted offers the top quality servers at the shared hosting group which is idle for many of us.
Siteground Hosting for WordPress
If you are running a business Site on WordPress or have a professional blog, you need to get hosting from Kinsta. Kinsta offers many innovative features that will straight away decrease the loading time of a WordPress website. Some of those features are:
PHP 7.4
Kinsta uses Google cloud infrastructure to host your WordPress website and this gives you the ability to choose from the plethora of data centre choices. If you are using WooCommerce platform, then only use those hosting: SiteGround Kinsta
Don't use too many WordPress plugins
One of the most important powers of WordPress is plugins, and some of you're so obsessed with this, that you're using over 30-40 plugins on your own blog. Well, not all plugin is poor, and I have covered a great write-up on how many WordPress plugins you should utilize.
Attempt to minimize the amount of plugins on your own blog and regularly clean up your database. Advanced database cleaner plugin can help you do so in almost no time.
Make sure that you're using at least one cache plugin in your site, and I'm suggesting WP-Rocket plugin. 1 thumb rule, do away with obsolete plugins. Lots of our users also asked"How do I accelerate WordPress plugin"?
The very best method to do that is by using less WordPress plugins. Whenever you can, get the habit codes to bring a characteristic, that you need.
Another way is to use a plugin named Asset cleanup plugin, and block loading of programs on specific pages. See the below video to learn how to do so: Enabling Gzip Compression
By allowing Gzip compression, you can reduce the recovery time of website data from the server to your customer's browser. In other words, your website will load much faster.
There are plenty of free Gzip compression evaluation tools such as CleverStat and GiftOfSpeed that can check if your website has it on. If it is not, you may either use another WordPress plugin or modify the .htaccess file to enable it. Check out our article for a complete tutorial for both these methods.
Optimizing Images While we concur that stunning images can raise your content value, they're also one of the biggest culprits of slow sites. Media-rich sites are extremely prone to this specific matter. That's because high-quality images take longer to load, thereby slowing down your overall speed. Use a WordPress image optimization plugin or scale the pictures. If you want to go with the initial method, then our guide can help you get through the process using the Smush WordPress plugin. As an alternative, you may go to this page to learn more about the picture scaling process.
Splitting Long Content into Pages
Pagination is another trick to speed up WordPress websites. You can apply this procedure to the comments section and pages or posts with a great deal of content. By splitting them, you can avoid jamming up the site's bandwidth and overwhelming visitors with a ton of information.
From your WordPress dashboard, navigate to Settings -> Chat.
Conclusion :
As per yur business try to get a best wordpress theme and then apply these basic ideas to speed up wordpress website speed and get best loading time
#wordpress site speed#best loading time wordpress#wordpress site loading time#wordpress plugin#best seo wordpress plugins#image optimization#content optimization#what is a good site speed#how can i improve my#google page speed#website speed optimization#wordpress plugins#seo tools
0 notes
Link
How to do basic cleanup on computer computer boosting
If you are tired of your slow computer then you can go for basic clean up. You can boost your computer by performing a basic clean up. Learn more about how to do basic cleanup on computer through this video. Visit https://www.routerloginsupport.com/ to know more.
https://youtu.be/DVbqVqxaOA8
0 notes
Text
How to Boost Windows 7 Performance
Although Windows 8 has been rolled by Microsoft about two years ago, the average computer user is probably still using Windows 7 and will continue to do so for quite a long time. The patch updates for the said platform did not stop even after the release of a new Windows OS. There are about 630 million users of this particular operating system, so you are sure that Microsoft will not be pulling the plug (or the support department) anytime soon. Since the support for Windows 7 will still continue, it is better if you'll just maintain your computer in a good condition rather than upgrading it to a new operating system. Thus, here are some quick tips on how you can boost the performance of your Windows 7. 1. Check your Windows Experience Index score. Microsoft has created a certain index in order to measure the capabilities of both your computer's hardware and software. This is called the Windows Experience Index. It quantifies your computer's performance via a base score, which ranges from a score of 1.0 to 7.9. To achieve great system performance, your base score should be high. How can you check your score based on the Windows Experience Index? Follow these instructions: * Click the Start button on the lower-left side of your desktop. * Select Control Panel. * Open the Performance Information and Tools. * Click Rate this computer. If you have already had a previous assessment, click the Re-run the assessment to get your latest base score. * You may be prompted for an administrator password. Kindly enter this information, and then click OK. After you have seen your Windows Experience Index score, you can now determine if your computer is in need to tweaking or not. For instance, if you will just perform basic tasks in your PC such as writing documents or surfing the net, then a score of 2 is fine. On the other hand, if you want to run a graphics software smoothly, a score of 4 and higher is recommended. If there is a need to improve your base score, you may do the succeeding steps. 2. Adjust the visual effects. Depending on your hardware's capabilities, adjusting the visual effects can have a good or detrimental impact on your computer's performance. Through the Adjust visual effects menu, you can change how desktop elements such as windows or dialog boxes appear in your computer. To access the Adjust visual effects menu, and to tweak it for best performance: * Open the Performance Information and Tools. * In the left-side of the menu, click Adjust visual effects. * Under the Visual Effects tab, select Adjust for best performance. * Click OK. 3. Adjust your indexing options. Whenever you find a document or a program through the Search bar, your computer uses the Indexing service in order to look for the specific file that you have requested. By improving the Indexing capabilities of your computer, you will be able to increase the way it fetches information. To access the Adjust indexing options menu, and to tweak it for best performance: * Open the Performance Information and Tools. * In the left-side of the menu, click Adjust indexing options. * In the Indexing Options, click Modify. * Select all locations then click OK. Note however that the Indexing service eats up a lot of memory, so you better proceed with caution. Determine first if your computer can handle a more sophisticated Indexing service. 4. Use disk clean up. Finally, you can use the Disk Clean Up tool to get rid of the unnecessary files in your computer. Temporary files such as internet cache and cookies, and deleted files in the recycle bin needs to be removed to free up space in your computer. An expanded space will definitely bring about improvement to your computer in terms of speed. To use the Disk Clean Up tool: * Open the Performance Information and Tools. * In the left-side of the menu, click Open disk cleanup. * Select the drive to be run by the Disk Clean Up. * Wait for the Disk Clean Up to finish analyzing the drive. * The Disk Clean Up dialog box will appear, along with the possible files to be deleted. Tick on each file that you want to be removed. * Click OK. With the impressive support that Microsoft offers for the Windows 7 platform, it is much better for its users to maintain their software instead of jumping to another system. Given this, the guidelines above will definitely help you in keeping your Windows 7 in good shape.
0 notes
Text
My Top 10 Tips to Speed Up Your Computer
At some point in time we all reach the point where our computer is not running a quickly as we like. With an aging computer, it's almost inevitable. But, there are many things that you can do, short of buying a new computer, that allow you to get a quicker, more responsive computer. Before I give you my ten tips, I want to introduce you to a tool that comes with Windows Vista and 7 that assesses your computer's problems. It'll give you a better idea of what might be the main problem with your computer, and enable you to fix the problem(s). Firstly, click Start, then Control Panel. Now go to the System and Security tab and click System. In the menu that appears, click Performance Information and Tools under the See also heading of the left panel. Next click Advanced Tools in the left panel and in the new dialog, scroll down and click on Generate a System Health Report. This will take a few minutes to identify possible issues with your computer. It might also be useful to re-assess the Windows Experience Index. If you need any help with interpreting these results, just contact us. Without further adieu, here are my top 10 tips for how to speed up your computer:
1) Free disk space
Perhaps the most obvious option is simply to free up some of your disk space. This provides more space for the system to run and thus your computer can be quicker as a result. To do this, click Start, Control Panel, click the Programs tab and then Programs and Features. Then a list of your programs will come up. Simply select a program that you don't need or don't want anymore and click uninstall. It's that easy! After you've removed some unwanted programs, especially large programs, you should notice your computer speed up a bit.
2) Clear your internet cache
Here's another tip that people often forget. Clearing your internet cache can boost the speed of your browser and by extension, your computer. What is the internet cache you ask? When you visit internet sites, your internet browser stores information in a folder, called a cache. If it's been a long time since you've cleared your cache (or you've never cleared your cache) then it'd be a good idea to clear it. Here's how to do it on Internet Explorer: Go to Tools, then click on Internet Options. Under history, click on Delete and tick the types of stored data you'd like to remove from the cache.
3) Run a disk cleanup
Often an overlooked feature, the ability to run a disk cleanup is a simple and effective way to make your computer run faster. Basically, disk cleanup identifies and removes superfluous system files, helping to make your computer run quicker as a result. To access this tool, click Start, Computer then right click the disk that you want to clean (usually your C:/ drive) and click Properties. In the popup that appears, click disk cleanup. The program will then assess your computer and present you with various options of files that it can remove and the amount of space that will be freed. If you're unsure about what to select, simply leave the defaults. Then, disk cleanup will run and do the rest for you! Another program that's good to download which performs a similar function is CCleaner.
4) Perform a defrag
Another powerful tool that you can use that most people don't utilise is the defragmentation tool that comes with Windows. Defrag analyses the way that the files are arranged on your hard drive and re-arranges them to promote speed and efficiency for your computer. It's like auditing and sorting the computer's files basically. To run a defrag, go to Start, Computer and then right click on the drive you want to run a defrag on and click Properties. From the dialog that appears, navigate to the Tools tab and click on Defragment now. From there, follow the prompts to analyse and defragment the volume (this part slightly different depending on your version of Windows) (P.S I'm following my own advice and ran a defrag on my own computer whilst writing this).
0 notes